

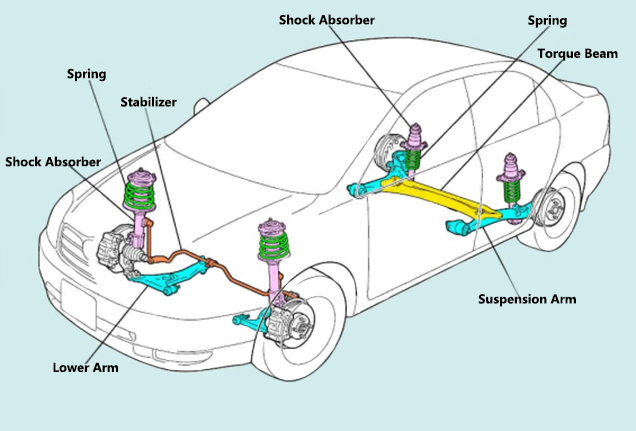
How to check the car suspension and repair?
Suspension Inspection Road Test Diagnosis
(1) Drive Alongside Parked Vehicles Or Walls.
Any noise generated by a vehicle's suspension or tires can be reflected on an object, such as a row of stationary vehicles or a wall placed along a street. For better results, open the window and drive next to a stationary vehicle or the left retaining wall, then drive close to the right as described above. Usually the noise is generated by defective wheel bearings or power steering pumps and can be heard during testing.
(2) Driving In The Driveway.
When the suspension encounters the collision instant steering, it often causes the suspension failure. At this point, slowly drive the car to the curb lane, do it again, the reaction will be more obvious. The kerb causes the suspension to compress as the wheel turns. Defective lateral stabilizer bar bushings, control arm bushings and ball joints usually produced noise during this test.
(3) Drive In Reverse When Turning.
Usually used to find possible defects in external constant speed universal joints used on the drive axle shafts of front-wheel drive vehicles. It pushes the suspension system to work in the opposite direction from the normal direction, causing the reversal of any excessive clearance in the suspension system, while often producing noise or causing vibration during testing. In addition to defective constant velocity universal joints, this test will often detect wear of control arm bushings, ball joints, stabilizer bar bushings or connectors; Defective or worn steering components can also be found, such as follow-up steering arms, tie rod ball joints or middle tie rods.
(4) Driving On Rough Roads.
Worn or defective suspension (and steering) parts can cause a vehicle to bump or hurl from one side to the other when driving on dented or raised roads. Worn or defective ball joints, control arm bushings, transverse stabilizer bar bushings, transverse stabilizer bar hinge heads, or worn shock absorbers may occur.
Once the fault has been identified, further inspection can be carried out in the repair room.
TIP:
Road tests should be done before any repair work to confirm the fault and try to determine its cause; After completion of maintenance work, road tests should be performed to confirm that the customer reported problems have been resolved.
Basic Inspection And Maintenance Of Suspension
1) Test The Shock Absorber Condition
First of all, the suspension on the car test, the vehicle repeated shaking 3 or 4 times, each thrust as far as possible the same. When springback, attention should be paid to the resistance of the pillar and the number of times the body bounces back. If the body bounces back 1-2 times after letting go, the body will immediately stop springback, and the number of times of the left and right sides are the same, indicating that the shock absorber (pillar) is normal, as shown in the figure.

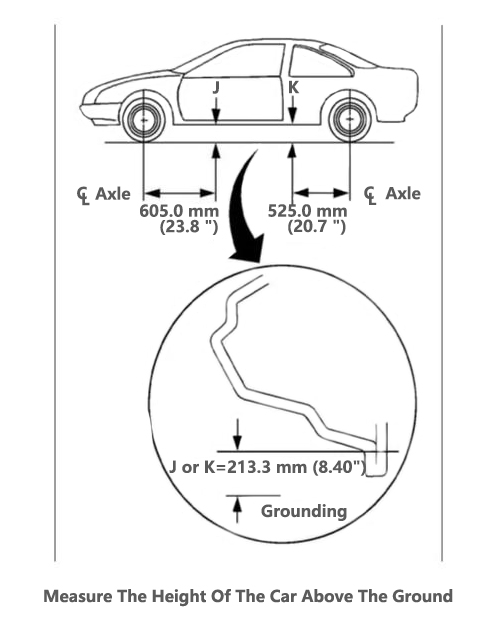
2) Make Sure The Chassis Height Is Correct
According to the maintenance manual, determine the measuring point and measure the height of the vehicle from front to back or from left to right, as shown in the figure. If there is a difference in height, it indicates that the helical spring has become soft. It should be noted that the measurement points are different for different models, even for different models produced by the same company.
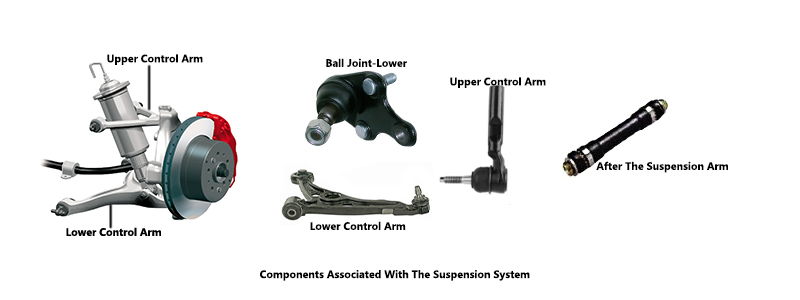
Maintenance Of Front Suspension Components
1) Front suspension appearance inspection
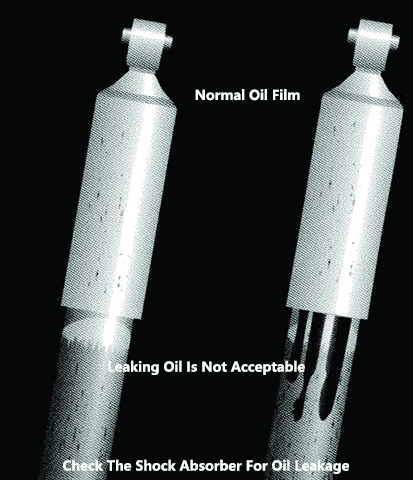
(1) Check the shock absorber. If oil seepage or oil leakage is found, it must be replaced, as shown in the figure.
(2) Check all fixed parts of the shock absorber and slide column.
(3) check whether all suspension is loose, cracking, cracking, dislocation and abnormal sound.
(4) Check whether the fixing device, linkage rod and all connecting parts are loose, stuck or damaged. Tip: Shock absorbers and slide columns are always replaced in pairs.
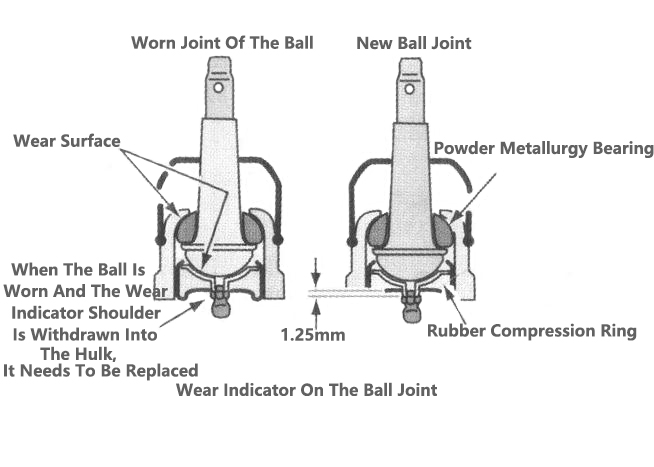
3) Maintenance Of Ball Joints
(1) First check whether the ball is equipped with a wear indicator. When checking the ball joint, first check whether the ball joint is equipped with a wear indicator. If there is a wear indicator, check the displacement of grease nozzle. If the grease nozzle has retracted, it indicates that the ball joint is worn and should be replaced, as shown in the figure. For some cars, it is recommended to check whether the grease nozzle can shake in the ball joint, if it can shake, indicating that the ball joint should be replaced. Check the maintenance manual when inspecting the ball joints.
(2) Carefully check the ball section dust jacket. Damage to the dust cover or ball seal will make the lubricating oil leak, and let dust and impurities into the grease. If the dust cover is damaged, the ball joint should be replaced. If no damage is found, squeeze the dust cover slowly. If the dust cover is filled with grease, it will feel somewhat hard. If grease nozzles are provided on the ball joints and show a lack of grease, grease gun is used to fill the grease until new grease flows out of the air vent of the dust cover. If the grease filling the ball joint is too much or too fast, the dust cover may be removed from the installation position or rupture.
4) Helical Spring
If the vehicle travels below the specified height, the helical springs should be replaced in pairs.
5) Control Arm Bushing Inspection
If the bushing between the control arm and the frame is in poor condition, accurate wheel positioning cannot be maintained.
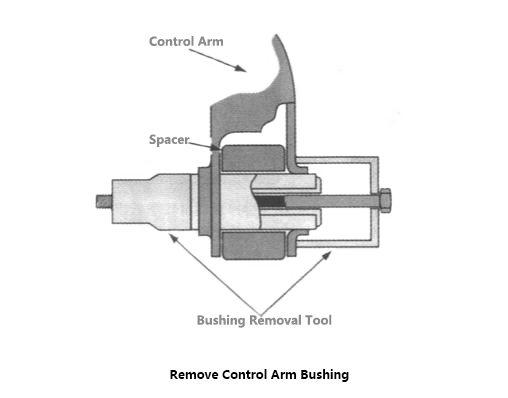
Visually inspect each rubber bushing, check whether there is deformation, movement, eccentricity and serious cracking, check whether the metal bushing will produce abnormal sound and whether the seal is loose. To remove the control arm bushing, lift the car up and support the frame with a safety bracket, remove the wheel assembly and install the spring compressor onto the coil spring.
Disassemble the ball studs from the steering knuckle as described above, remove the bolts securing the control arm to the frame, and remove the control arm. The bushing is pressed into or out of the seat hole with a special tool. After selecting a suitable size adapter, install the special tool on the bushing (FIG. 13-17), expand the special tool, and press the bushing out of the control arm. The new bushing can be pressed into the control arm in the same way, and the bushing is pressed into the hole of the control arm as the special tool is tightened. When installing new bushings, ensure that bushings are pressed vertically.
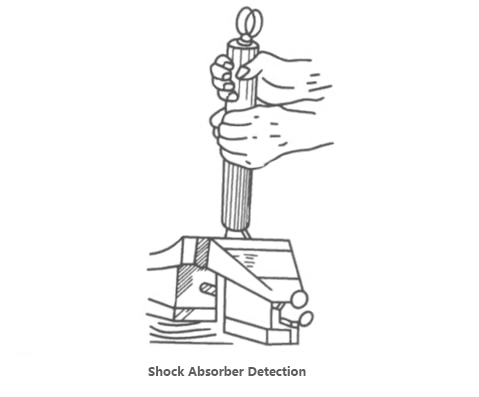
6) Maintenance Of Shock Absorber
The shock absorber can be tested on the workbench (see figure). First, the shock absorber is fixed in accordance with the installation direction on the car; Then, the shock absorber is fully extended; Next, turn the shock absorber upside down so that it is fully compressed. Repeat this process several times. If the shock absorber sticks or bounces in the middle, or if it gets stuck at any point in the journey, a new shock absorber should be used. If the shock absorber has abnormal sound or large difference between compression and expansion speed, it should also be replaced. If there is a leak in the shock absorber or the work is still unstable after air removal, the shock absorber should also be replaced.
7) Check The Wheel Bearing
(1) Remove the front wheel.
(2) Remove the front wheel brake calipers and brake discs.
(3) As shown in the figure, check the hub bearing clearance, the maximum value is 0.05mm, if it exceeds the maximum value, replace the hub bearing.
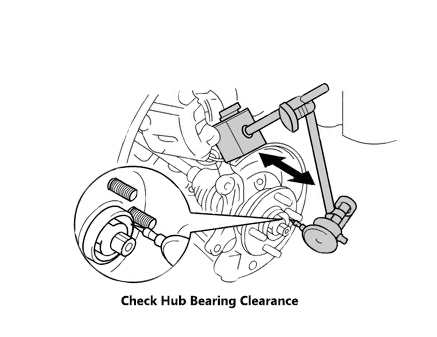
(4) As shown in the figure, check the front wheel yaw. The maximum value is 0.07mm. If it exceeds the maximum value, replace the front hub assembly.

(5) Install in reverse order.
8) Other Parts Of Suspension Inspection And Maintenance
(1) Before checking the wear and damage of the shock absorber suspension bearing, it should be able to rotate flexibly, such as serious wear or damage should be replaced, when the replacement can only be replaced as a whole.
(2) Rubber parts, buffer blocks if there is damage, cracking, aging and other phenomena, but also to replace the new parts. Metal rubber support can not be repaired, if there is loosening, cracks, damage, fracture and other phenomena, need to replace the new parts.
(3) Check whether the bracket, transverse stabilizer bar and trapezoidal arm are deformed or cracked. If there is deformation or crack, welding and straightening are not allowed on the front suspension support position and guide device parts, only replacement. It is also necessary to check the damage and aging of the rubber bearing and rubber bushing of the transverse stabilizer bar, the front and back bushing of the trapezoidal arm or the swing arm, and replace them.
(4) If the frame and rocker arm are deformed or unwelded, they must be replaced. Welding or shaping of the frame and rocker arm is not allowed.
We will do a good job in every content,do our best to solve the problem for each customer,Thank you for your reading.
Leave A Comment